With a plan in hand, I just needed to get started. Knowing that I needed to rebuild the engine, upgrade the suspension, and paint the body, there was only one thing to do—start tearing the car apart.
The first step toward rebuilding and restoring the car is pulling the engine. Unfortunately, since the Fiero is a mid-engine, rear-wheel drive car (and it was made in the 80s), there’s not a simple way to remove the engine. The entire drivetrain assembly and subframe needs to be dropped from the bottom of the car—not the simplest process in a garage.
I needed to map out the entire process.
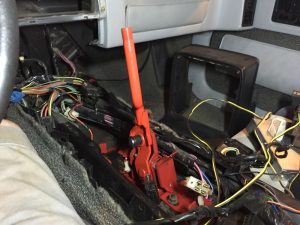
Removing the engine from a Fiero is relatively straightforward, provided you’ve done your homework. I spent countless evenings watching videos, reading guides, pouring over how-to articles, and referencing my own car as an example. Throughout my time researching removing the engine, I also worked on getting the car ready—removing the front and rear fascias, taking stock of any previous work on the car that I could see so that I could take those modifications into account, and dismantling the center console and unplugging the wiring harness from the ECU inside the passenger compartment to make sure that it was ready to be pulled out.
During this process, I also ordered some supplies and tools so that I would be ready when the time came for the engine to come out.
There were various points along the way to getting the engine ready to come out that I had some down time, where I either was waiting for a tool or I didn’t have the space or time to begin the process, so I was able to do some smaller tasks in order to continue being productive.
The first was removing the existing shifter assembly out of the car.
With the console out of the way, I pulled the four nuts holding the shifter in place and removed the shifter for the 5-speed transmission. I’d picked up the correct 4-speed from a local member of a Fiero forum, he also included the correct shifter assembly for it as well, which was great!
Before I installed the new one, though, I thought I would clean the surface rust off of it and paint it. It wasn’t necessary, but it was a) something to keep me busy and b) would be a nice touch for when I re-installed the console and just a touch of color would peak up through the shifter boot.
Once the assembly was cleaned up and I was ready to paint, the only thing left to do was choose a color. I decided that I would match the accents to the engine, which I decided to paint Chevrolet Red-Orange.
Next on the list of small projects was preparing and painting the two heat shields that attach to the rear fascia, just above the exhaust outlets. The shield on the passenger side was in good shape, just needing to be cleaned up. The driver’s side, however, was bent quite a bit. I spent a fair bit of time hammering the heat shield flat again before I could start cleaning it and moving on to painting. These would also get the same Chevy Red-Orange.
The last small project was one that I hadn’t anticipated, it jumped out at me while I was pulling out the console and shifter—replacing the padding of the steering wheel. Behind the leather wrap around the Fiero GT’s three-spoke steering wheel is foam padding. Unfortunately, the squishy foam tends to deteriorate with age. And with the car clocking 31 years since its birth in Pontiac, its had a long time to break down, melt, and start seeping through the stitching of the leather as a sticky brown mess.
Step one of this process: remove the steering wheel from the car. This was relatively straight forward, it simply required a specific tool—the steering wheel puller. This device is surprisingly simple: you have a plate with holes in it that to stick bolts through and thread into the steering wheel (luckily there are threaded bolt holes in most, if not all, steering wheels just for this purpose), then you thread a long rod through the center of the plate so that it comes in contact with the tapered shaft that the steering wheel is attached to. Finally, you take a wrench and tighten the rod, which pushes against the steering shaft and pulls the wheel off. Pretty neat!
The next step was to remove the leather steering wheel cover. This required the careful use of a razor blade to cut the thread and a hook to pull it through the holes that it was stitched through. It wasn’t a difficult task, but it was incredibly time consuming.

Step three was disgusting: removing the leftover goo-that-was-once-foam from the steering wheel, as well as the inside of the cover. This was also incredible time consuming. I made use of a couple of flat dental tools, some solvent, and some cleaner. After several hours of scraping, wiping, and cursing, the wheel was clean. I didn’t want to completely ruin the leather cover, so I used minimal amounts of cleaners and solvents on only the most caked on areas of foam goo. I didn’t get it spotless, but it was infinitely cleaner than when I removed the cover in the first place.
To put the wheel back together, I needed something to replace the padding and the thread. Luckily, I had some old felt laying around that I could use as the padding. Unfortunately, I didn’t have any thread heavy enough for use on leather so I had to go on a search. Ebay came to the rescue!
I was able to find some steering wheel thread in orange to go with the color of the shifter. The only issue was waiting for it to arrive.
In the meantime, there were some chips in the paint on the steering wheel spokes, so I used the time I had while the thread shipped. I, of course, used the Chevy Red-Orange.
After about a week, several coats of paint, and some patient waiting, the thread arrived and it was time to put the cover back on! It fit incredibly tight around the wheel, but at least it would hold itself in place. Stitching the cover back up wasn’t all that pleasant, though. It required a lot of patience, time, and measuring and re-measuring the length of thread for each section (fortunately, I only had to re-stitch one section before I figured out how to estimate how much I needed).
With the cover back on the wheel, I was pleasantly surprised with how it turned out. it would have probably been much nicer had I gotten new leather for the cover and made a new one, but I was pretty happy with my work. With it all together, all that was left to do was to clean the outside of the leather and condition it.

Finally, it was time to pull the engine out.